Recipes
Recent Articles

Recipe: Griddled Cheese Sandwich With Sage And Crushed Coriander Seed
Gooey, crunchy and yummy, this sandwich pairs well with a glass of chilled rosé.
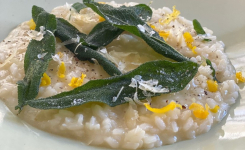
Recipe: Meyer Lemon And Fried Sage Risotto
The sparkling perfume and tang of the Meyer lemon (plus the fried sage) elevates this dish to a special event.

Recipe: Ooma Tesoro’s Mussels Fra Diavolo
Ooma Tesoro shares its recipe for mussels fra diavolo using its one and only marinara sauce.

Recipe: Haven Café’s Sweet Carrot, Pear, And Ginger Soup
Five ingredients, vegetarian and vegan friendly: what's not to love about this comforting soup?

Recipe: Neil Fox’s Codfish Veracruz
This recipe emboldens the fish with the spicy flavor of chorizo, a few hand-picked spices, and the salty taste of clams.

Recipe: Cranberry Sauce
Musings from Janet Elsbach on Thanksgiving pleasures, plus this easy, make-ahead cranberry sauce.

Recipe: Gâteau Concorde (Concorde Chocolate Meringue and Mousse Cake)
We are pleased to offer a recipe from the new book, "GÂTEAU: The Surprising Simplicity of French Cakes."

Recipe: Bourbon-Spiked Boneless Pork Loin Roast
Seared on the outside with a beautiful crust, it yields a slightly rosy center dripping in jus.

Recipe: Roasted Fall Salad
The perfect transition from the summer salad bowl to cooked vegetables...and musings about a girl named Autumn Hughes.

Recipe: Tomato Jam
Here's a way to honor your tomato crop: a sweet and savory jam that's a natural for appetizers when paired with cheese.

Recipe: A Very Refined Peach Granita
LIFE (the magazine), a remembered story about China, and the refinement of peaches lead us to this granita.

Recipe: Grilled Eggplant With Sapa
Pamela Osborne was inspired by cookbook author Letitia Clark and shares with us Clark's edited version of this eggplant recipe.

Recipe: Sort Of The Woodland’s Coleslaw
An extended kitchen renovation led Pamela Osborne to this "really good, classic coleslaw."

Recipe: Potato Salad (Part 2 Of 3 Summer Salads)
We move along to a potato salad with chopped habanero peppers and caraway.

Recipe: Blueberry-Cornmeal Cake
Miriam Rubin offers a a simple cake recipe that makes the most of berry season.

Recipe: Penne Salad with Onion and Relish
Pamela Osborne shows us how to make this deli favorite at home, with no waiting in line or pre-ordering required.

Recipe: Kimchi Yogurt Dip with Cilantro And Sumac Pita Chips
Umami flavor, tartness, and crunchy chips combine to make this an unusual and tasty summer dip.


Recipe: Pasta Salad With Chicken, Summer Vegetables And Mint
A lesson about "resistant starch" and an easy pasta recipe that'll benefit your microbiome.

Recipe: Fish, Bean, And Tomato Stew
This stew, though served hot, is light enough for even this time of year.