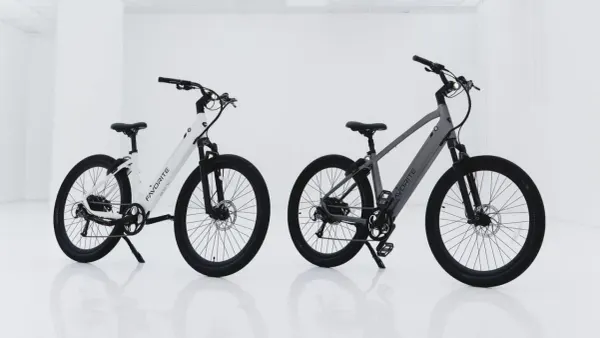
Picture the least glamorous part of your next ride: getting aboard outside the grocery store, stopping at a busy crossing, or walking the bike through your front door. Those moments can tell you more about a useful frame style than a photograph of an empty bike on an open road.
For an adult choosing a first e-bike or replacing a familiar bicycle, the question is not which frame wins overall. It is which complete bike makes your everyday movements feel manageable. Compare a step-through and a step-over around the tasks you will repeat, wearing the clothes and shoes you actually ride in.
Start with the movement, not the label
A step-through has a low or absent top tube, creating an opening to step through when mounting. A step-over has a higher top tube to clear. The opening varies between models, so look at the actual frame rather than assuming every “low-step” requires the same movement.
With the bike supported and its assistance switched off, try getting on and off from your usual side. Wear your everyday footwear and consider whether trousers, a long coat or a skirt restrict the movement. Secure loose clothing away from moving parts before riding. If you normally swing a leg behind the saddle, notice where a rear bag would sit.
Choose the movement you can repeat comfortably without catching clothing or tipping the bike awkwardly. Neither frame is a gender or age category, and a lower opening does not make a bike automatically safer. If both movements work well, let fit and handling decide the next round.
Check the riding position after getting aboard
Easy entry is only the beginning. A low frame opening does not tell you whether the saddle goes low enough, whether the handlebars are within comfortable reach, or whether you can operate the brake levers confidently. Likewise, a higher top tube does not guarantee a stretched-out, sporty position.
Ask the shop to set the saddle for you within the model’s adjustment limits. Pedal and check that you are not rocking your hips or reaching awkwardly for the bars. Then practise the stopping position with support. Do not assume a suitable pedaling height will let you sit on the saddle with both feet flat on the ground; have the shop demonstrate a controlled stop and dismount.
For a visual introduction to the two shapes, FavoriteBikes’ guide to e-bike frame styles offers a starting comparison. Use it to identify the layouts, then judge posture, carrying ability and control on the specific bikes you try—not on the frame label alone.
Make stopping part of the test ride
A bike that feels pleasant once moving still needs to work at walking pace. On a flat, traffic-free test area, follow the shop’s instructions for selecting a low assistance setting. Practise moving off, making a broad turn, braking smoothly and putting a foot down. Repeat until you can compare the bikes rather than just their unfamiliar controls.
Notice whether you can steady the bike during a pause and move away without an uncomfortable lurch. Try walking it, turning it around and backing it into a parking space with the assistance off. A low opening can simplify getting off, but it does not remove the bike’s weight or take care of balance for you.
If a bike feels difficult to hold at a stop, ask about fit or a different model before deciding that you simply need a different top tube.
Bring your everyday bag into the comparison
A rear basket or tall rack bag can occupy the space used by a leg swinging over the saddle. Ask to check mounting clearance with your intended bag installed. A step-through may offer a convenient alternative movement; a step-over may still suit you if you can clear the setup comfortably.
Check the whole bike’s carrying limit, the rear rack’s rating and each basket or pannier’s limit separately. Read what each figure includes: a total system limit may count the bike itself, while other manufacturers describe payload differently. A large rack rating does not override the bicycle’s limit or a lower accessory limit.
Secure bags against shifting, keep straps clear of wheels and brakes, and check heel clearance while pedaling. Start any approved loaded handling trial with a small load and shop guidance. Do not infer cargo capacity, passenger suitability or frame strength from the presence or absence of a top tube.
Rehearse the trip from parking spot to storage
Measure the doorway, elevator or parking space you actually use. Compare the bike’s overall length and handlebar width, then walk it through a similar turn. A step-through is not necessarily smaller, lighter or foldable; a step-over is not necessarily easier to carry.
Check the weight of the exact size and equipment configuration, including the battery and fitted accessories. Before planning daily lifting, ask for help assessing a manageable handling method. If the battery is designed for user removal, follow that model’s instructions; do not assume an integrated battery can be taken out to lighten the bike.
For a vehicle carrier or wall mount, confirm weight capacity and compatibility with the exact frame. Frame-clamping and hanging systems need particular attention to tube shape and approved contact points. Do not assume an adapter solves every mismatch.
Finish with a side-by-side trial
Try both bikes with comparable fit adjustments and the same everyday setup. Keep four notes:
- Mount: Can you get on and off in your usual clothes, with your bag fitted?
- Stop: Can you brake, put a foot down and restart under control?
- Ride: Can you pedal and reach the controls comfortably?
- Park: Can you walk, turn and store the complete bike without an unmanageable lift?
Prefer the bike that handles those four tasks well. If neither does, try another size or model—not a compromise you will