Ear Piercings: Choose the Right Placement and Start Safely
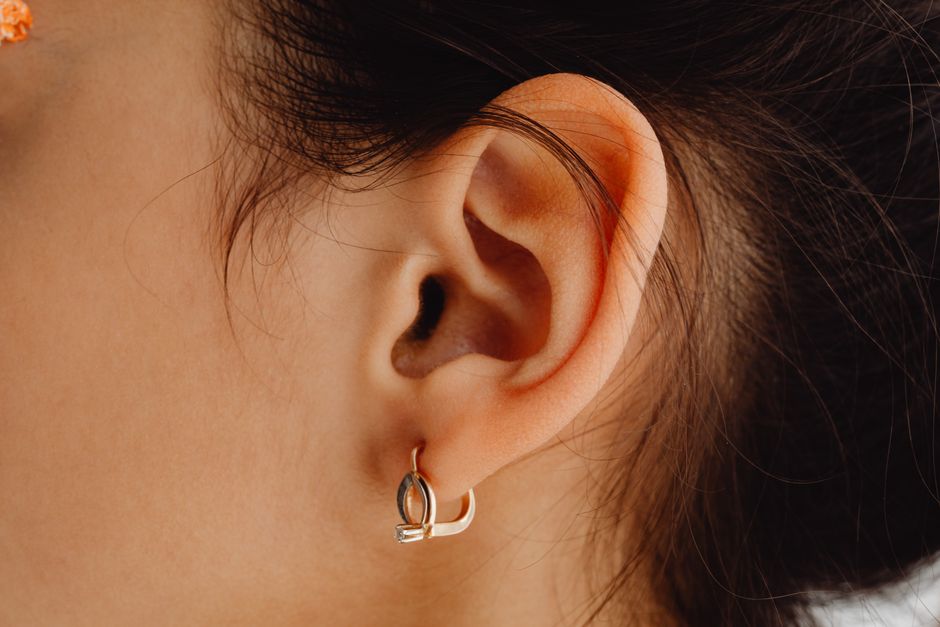
Ear piercings range from quick-healing lobe studs to cartilage placements such as helix, conch, tragus, and daith. For beginners, the safest approach is simple: choose a placement that fits your ear anatomy, visit a trained professional who uses a single-use sterile needle, start with body-safe jewelry, and follow aftercare until the piercing is fully healed.
- Lobe piercings are usually the least painful and heal in about 6 to 8 weeks.
- Cartilage piercings often hurt more and may take 6 to 12 months, or longer, to fully heal.
- Implant-grade titanium or solid 14k+ gold are dependable starter-jewelry choices.
- Clean with sterile saline, avoid twisting the jewelry, and do not sleep directly on a healing cartilage piercing.
Ear piercing can mark a cultural tradition, a personal milestone, or simply a new way to wear art. Whether you want one classic lobe stud or a carefully planned ear stack, placement affects the jewelry you can wear, how much it may hurt and the patience healing will require.
This guide maps the most common ear placements and covers the practical basics: safe tools, healing timelines, jewelry fit, cleaning, and when redness or swelling needs medical attention.
Anatomy, Placement, and Types of Ear Piercings
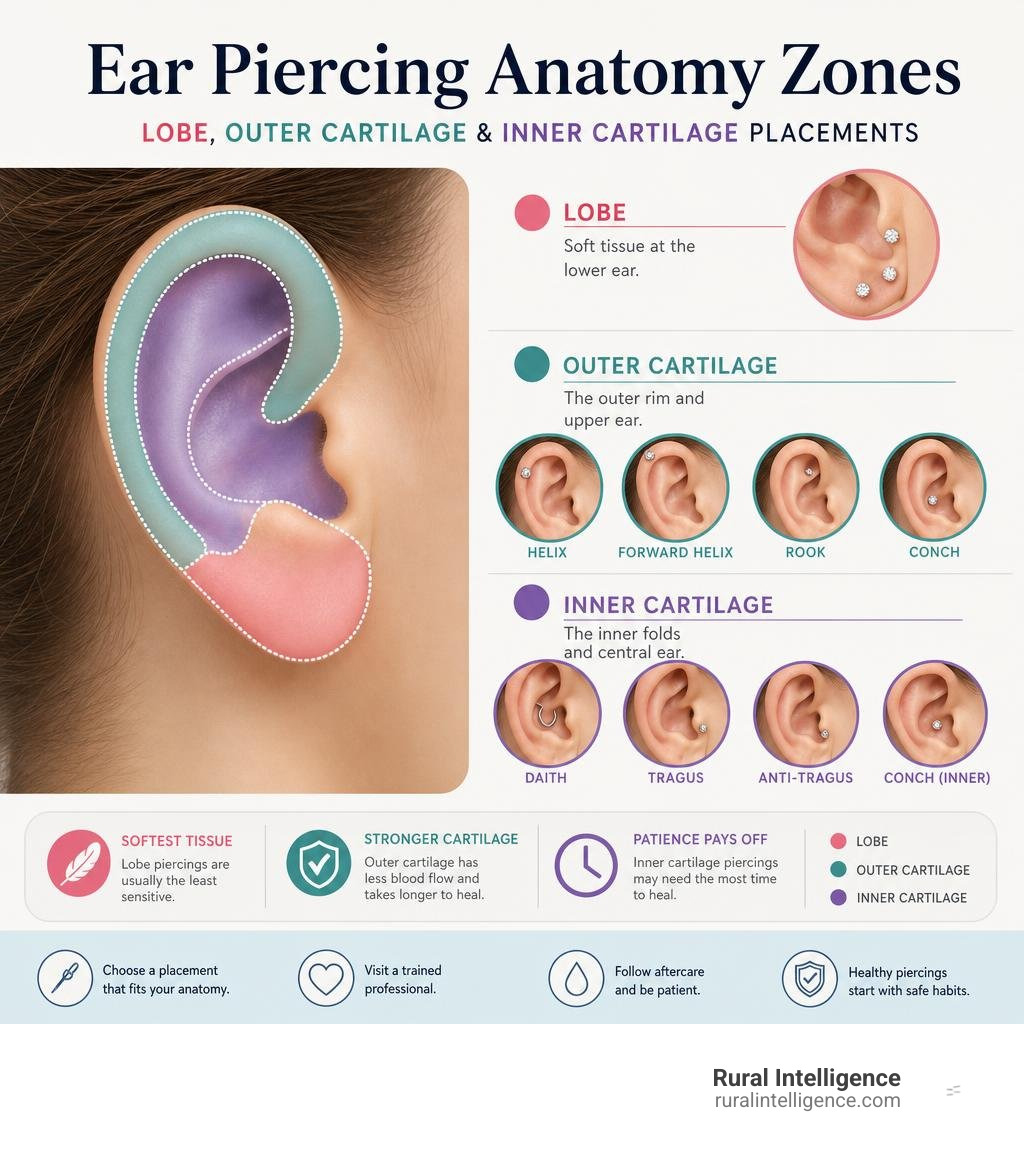
Planning a curated stack or constellation setup starts with understanding the unique landscape of your ear. Ear anatomy divides broadly into soft tissue (the lower lobe) and structural cartilage (the upper ridges, folds, and interior bowl). Because cartilage has significantly less vascular blood flow than soft tissue, each zone responds differently to needle pressure, jewelry styles, and recovery times. Exploring The Complete Guide To Every Type Of Ear Piercing | Bored Panda illustrates just how diverse these configurations can be across different ear shapes.
Lobe Piercings: Standard, High, and Stacked
The fleshy lobe serves as the natural anchor for almost every ear collection. Roughly 84% of women and 64% of men in the United States have pierced earlobes, making it the single most common body modification. Beyond the standard first placement centered on the lobe, you can expand horizontally or vertically:
- Second and Third Lobes: Placed along the ascending curve of the earlobe, these allow for graduated studs or hoop layering. Maintaining roughly 6 to 8 mm of spacing between lobe holes ensures the decorative earring fronts and rear backings do not crowd one another.
- Stacked Lobes: A vertical arrangement where a second piercing sits directly above a standard lobe piercing, creating a two-story column of sparkle within the soft tissue.
- Transverse Lobe: An uncommon horizontal piercing that passes through the lobe from side to side using a barbell, requiring generous soft tissue thickness.
Traditional Earring traditions show that the earlobe can bear more physical weight than delicate cartilage folds once fully healed, making it the ideal spot for statement drops, hoops, and varied gauges.
Outer Rim: Helix, Forward Helix, and Industrial
Moving up along the curved outer ridge of the ear brings you into cartilage territory:
- Classic Helix: Positioned anywhere along the upper outer cartilage rim. It can hold flat-back labrets initially and seamless huggies once matured.
- Forward Helix: Sits on the cartilage curve directly above the tragus, facing outward toward your face. Due to tight anatomical spacing, it requires dainty flat-back studs.
- Hidden or "Peekaboo" Helix: Tucked discreetly underneath the overhang of the upper rim fold, displaying a hanging charm or gemstone only visible from specific angles or when hair is swept back.
- Industrial (Scaffold): Connects two distinct outer cartilage punctures (the forward-upper rim and the rear helix) with a single, straight rigid barbell. It requires precise alignment and specific anatomical ridges so the bar does not press flat against the flat ear flat, which could cause permanent tissue indentations.
Inner Cartilage: Tragus, Conch, Daith, and Rook
The intricate interior folds of the ear offer striking structural focal points. Checking an Ear Piercing Chart: Full Placement Map & Guide (2026) – AJLuxe can help you visualize how these central features balance outer rim accents:
- Tragus: The small, thick cartilage flap sitting directly in front of the ear canal opening. It looks striking with micro-studs or tiny hoops but requires careful phone and earbud hygiene during healing.
- Anti-Tragus: The small ridge directly opposite the tragus, sitting right above the fleshy lobe.
- Conch: Situated in the deep central cartilage basin of the ear. It can be pierced right in the center for a brilliant gemstone stud or fitted with an eye-catching large-diameter hoop wrapping around the outer perimeter once matured.
- Rook: Placed vertically through the thick ridge of cartilage on the upper inside ear, just above the daith. It typically houses a curved barbell.
- Daith: Runs through the innermost cartilage fold right above the ear canal. While popular online rumors claim daith piercings cure chronic migraines by stimulating vagal nerve pathways, major neurological organizations classify any symptom relief as a placebo effect rather than a medical cure.
- Snug: Penetrates horizontally through the anti-helix ridge, sitting between the inner conch and the outer helix. It is visually bold but known as one of the most stubborn and prolonged cartilage placements to heal.
Needle vs. Piercing Gun: Safety, Tools, and Hygiene

When selecting where and how to get pierced, the method of puncture makes all the difference for long-term health and tissue preservation.
Sterilization and Cartilage Integrity
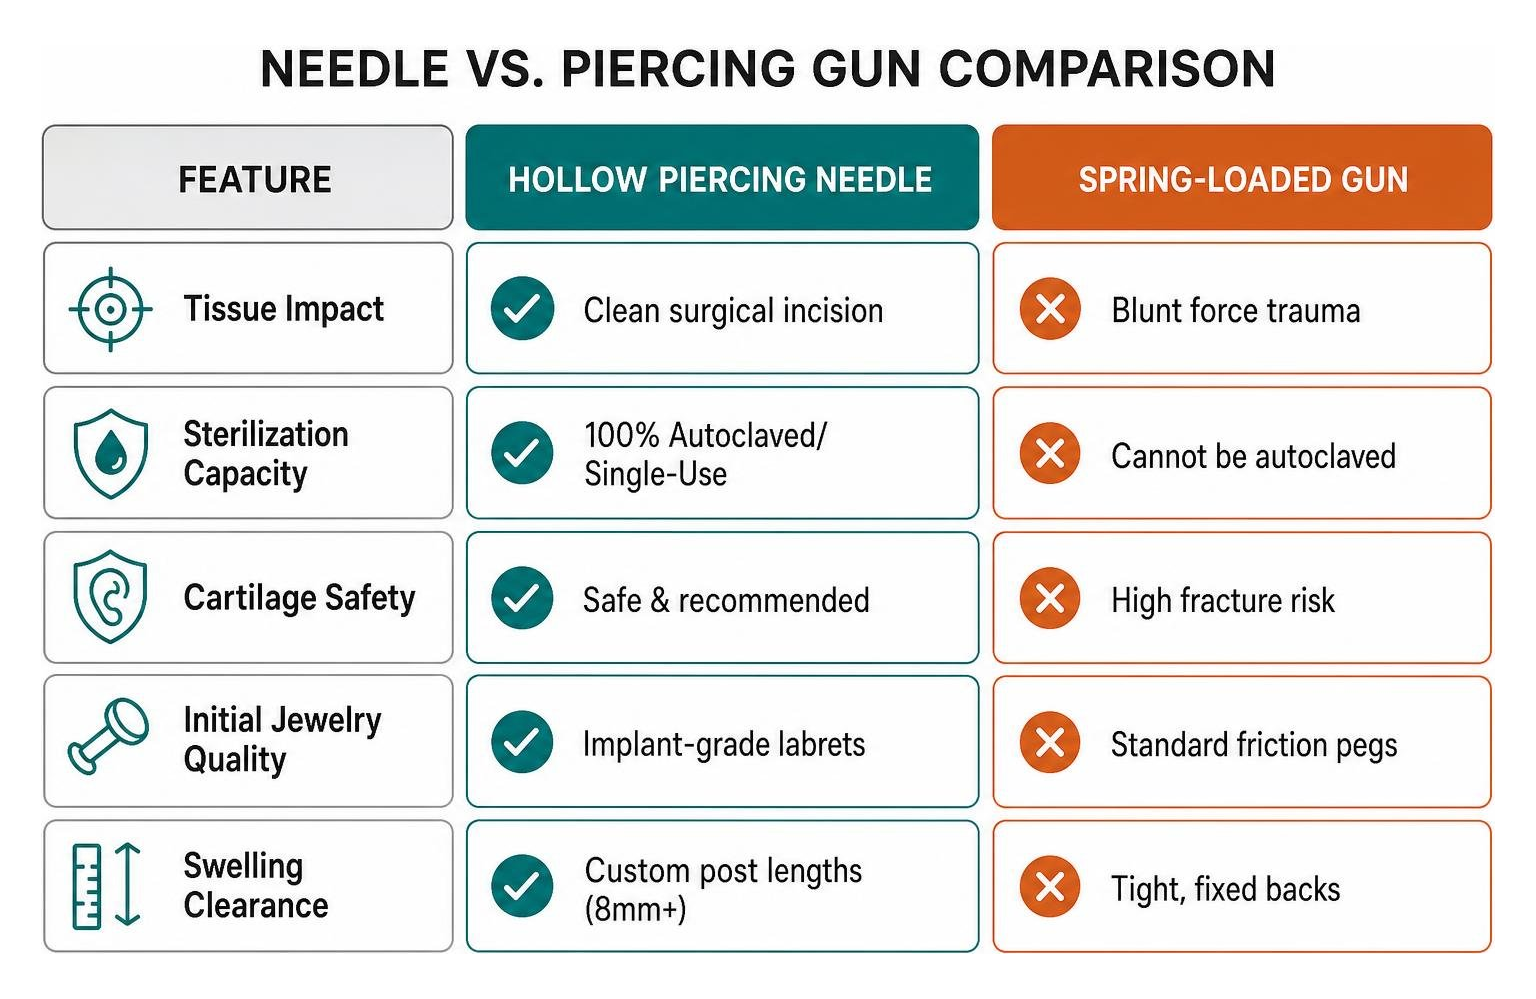
Professional piercing studios use single-use, beveled hollow needles. A hollow needle acts like a surgical scalpel: it creates a clean, precise opening by gently parting and coring a tiny path through the tissue to receive the jewelry post. This creates minimal surrounding trauma, preserves blood supply, and encourages swift tract epithelialization.
In contrast, traditional spring-loaded piercing guns force a blunt, dull earring stud straight through the tissue via heavy mechanical spring tension. While soft earlobes may sometimes tolerate this blunt trauma, piercing guns used on dense cartilage can fracture or shatter the underlying tissue, leading to extreme swelling, localized tissue necrosis, and permanent deformities like cauliflower ear.
Furthermore, piercing guns are manufactured from plastic components that cannot withstand the high heat and steam pressure of a medical autoclave. Wiping a plastic gun with an alcohol swab does not eradicate microscopic bloodborne pathogens, exposing clients to unnecessary contamination risks. Modern hand-pressurized medical cassette devices offer a gentler alternative for infant lobe settings, but hollow needles remain the gold standard for children and adults across all ear zones.
Professional Studio Standards and Qualifications
To protect your health, seek out professional piercers who operate under strict Association of Professional Piercers (APP) guidelines or state health licensing standards. A reputable studio maintains hospital-level hygiene:
- Sterile, individually wrapped, single-use needles opened directly in front of you.
- State-of-the-art autoclave sterilizers with regular biological spore testing records.
- Non-porous surfaces, medical-grade exam gloves, and thorough skin disinfection protocols using iodine or chlorhexidine swabs.
- Transparent age-verification and legal consent procedures.
Healing Times, Pain Ratings, and Jewelry Sizing
Every ear piercing heals from the outside in. The outer edges of the skin seal over first, while the deeper internal tissue tube—the fistula—takes months of cellular work to fully mature and strengthen.
Pain Expectations for Different Ear Piercings
Because earlobes contain primarily fatty tissue with low nerve density, they generate only a brief, dull pinch rated around a 2 out of 10 on standard pain scales. Dense cartilage contains far more structural resistance. Piercings like the rook, snug, and daith register higher on the spectrum due to the sustained pressure required to guide the needle through thick cartilage folds.
Industrial piercings hurt more because you are receiving two separate cartilage punctures in immediate succession on the same sensitive ear. As outlined in Ear Piercings: What to Know , taking extra-strength acetaminophen roughly an hour before your appointment can take the edge off procedural discomfort. Avoid aspirin or ibuprofen immediately prior to your appointment, as their blood-thinning properties can promote excess bleeding.
Healing Stages and Post Sizing
When your ear is pierced, your body responds with natural inflammatory swelling. To give the wound breathing room, a piercer will start you with a longer post (typically 8 mm or longer for lobes and cartilage). Leaving a tight, short post in a freshly pierced ear risks embedding the jewelry backing beneath the skin as the area expands.
Consulting an Earlobe Piercing Chart: Lobe Placement Guide (2026) – AJLuxe highlights how downsizing works over time:
- Inflammatory Stage (Weeks 1 to 4): Swelling, mild tenderness, and lymph fluid crusting are normal. The long starter post prevents pressure buildup.
- The Downsize Window (Weeks 4 to 8): Once initial swelling resolves, return to your piercer to downsize the post to a snugger 5.5 mm to 6.5 mm length. Excessively long posts left in past this window snag on clothing and tilt crookedly under side-sleeping pressure, permanently altering the piercing angle.
- Full Fistula Maturation (Months 3 to 18): The inner channel completely lines with skin cells, allowing safe transitions to hoops and decorative clickers.
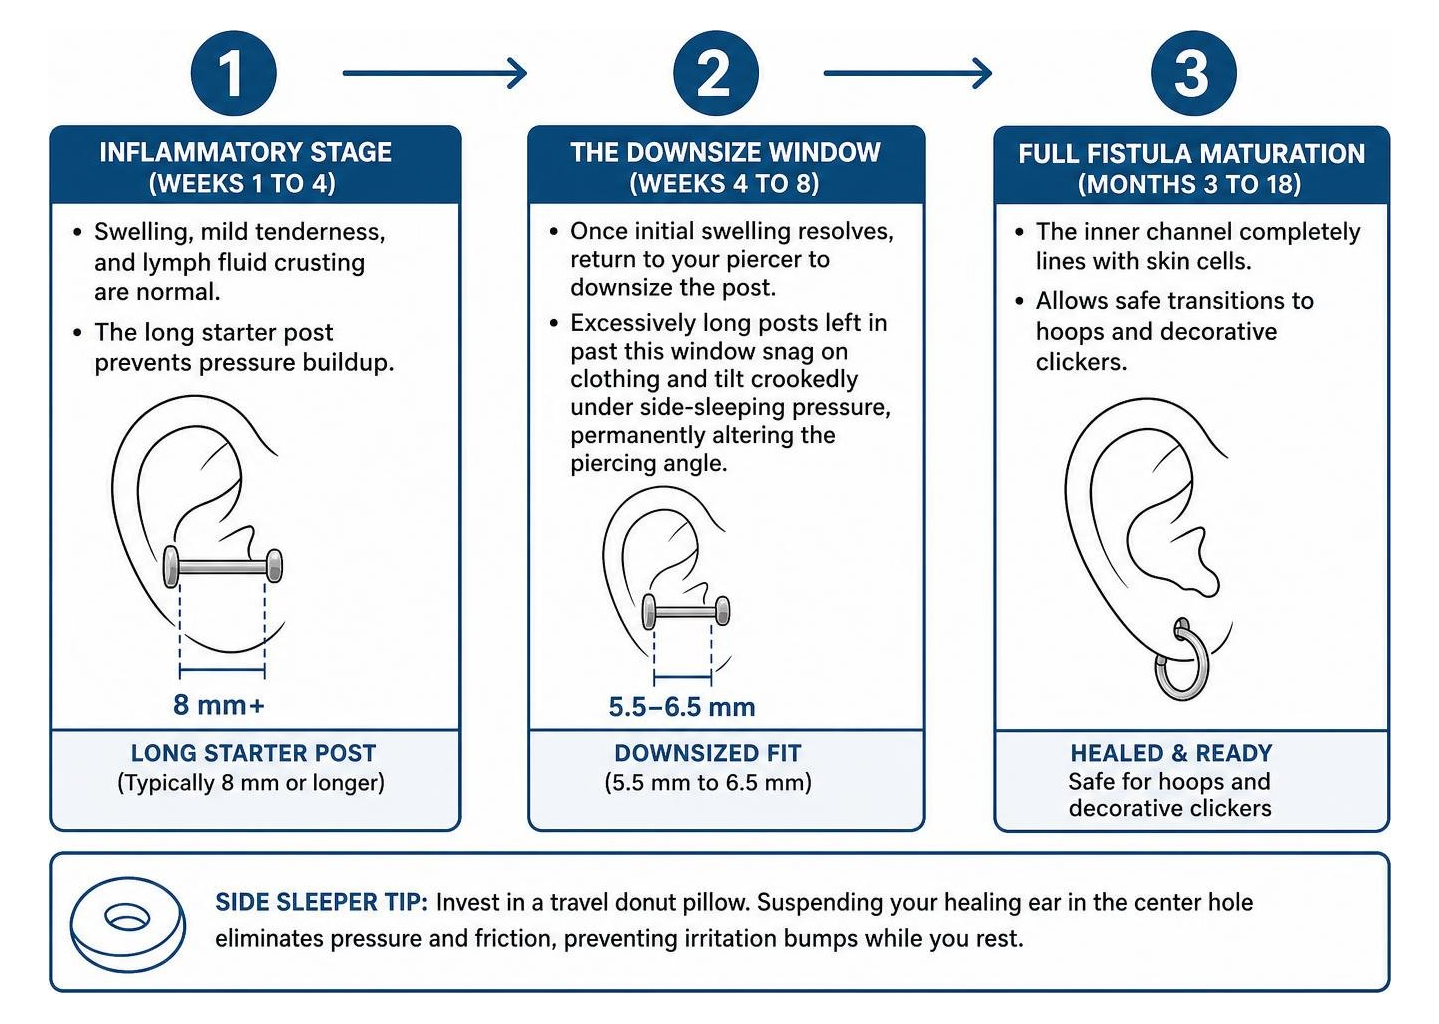
If you are a side sleeper, invest in a travel donut pillow. Suspending your healing ear in the center hole eliminates pressure and friction, preventing irritation bumps from forming while you rest.
Cleaning Routines, Metal Selection, and Aftercare

Wound care for an ear piercing requires a simple, hands-off routine. Avoid harsh bathroom chemicals and allow your body’s natural immune defenses to do their work.
Safe Starter Metals for Fresh Ear Piercings
Your body treats initial jewelry as an integrated implant while skin heals around it. Choosing low-grade metals triggers contact dermatitis and allergic reactions—which clinical studies note account for up to 43% of ear-piercing complications.
- Implant-Grade Titanium (ASTM F136): The premier standard for fresh piercings. It is completely biocompatible, ultra-lightweight, and 100% nickel-free.
- Solid 14k or 18k Gold: Excellent for healing tissue, provided it is solid gold rather than plated or vermeil. Plated jewelry flakes over time, exposing irritating base metals to an open wound.
- Implant-Grade Stainless Steel (316LVM): A reliable, high-finish metal for clients without pre-existing nickel sensitivities.
- Niobium: A pure elemental metal similar to titanium, safe for sensitive skin.
- Metals to Avoid in Fresh Piercings: Avoid sterling silver (which oxidizes and discolors open tissue), cheap alloys, and brass.
Daily Aftercare and Infection Warning Signs
Modern aftercare emphasizes gentle hygiene. Clean your piercing twice daily using a sterile 0.9% saline wound wash spray.
- The Saline Cleanse: Spray saline directly onto the front and back of the piercing. Let it sit for one minute to soften crust, then gently pat dry using a disposable paper towel or sterile gauze. Shared cloth bath towels harbor bacteria and easily catch on jewelry posts.
- Hands Off: Never touch, pick, twist, or spin the jewelry. Twisting rips away delicate new skin cells lining the fistula and drags surface bacteria directly into the wound canal.
- Products to Skip: Do not apply rubbing alcohol, hydrogen peroxide, antibacterial hand soaps, tea tree oil, or thick antibiotic ointments. These harsh astringents irritate healing skin, while ointments trap moisture and suffocate the wound.
- Water Precautions: Avoid soaking your ear in hot tubs, public swimming pools, lakes, or unsterilized baths until fully healed.
Research from clinical reviews such as New Ear Piercing: Healing and Aftercare notes that minor bacterial infections occur in up to 77% of piercing complication cases. If you experience persistent heat, excessive swelling, thick colored discharge, or fever, consult a healthcare provider promptly. Never remove the jewelry during an active infection unless directed by a doctor, as removing the post allows the outer skin to close, trapping the infection inside and potentially forming a painful abscess.
Frequently Asked Questions
How many ear piercings can you get in a single session?
Most piercers recommend limiting a single appointment to 2 or 3 lobe piercings or no more than 1 or 2 cartilage piercings. Piercings place a systemic metabolic demand on your immune system. Creating too many puncture wounds at once increases total swelling, prolongs overall healing timelines, and makes sleeping comfortably almost impossible.
Why is twisting or rotating fresh earrings no longer recommended?
Twisting fresh earrings is an outdated piece of advice from decades past. A new piercing is a puncture wound trying to construct an internal skin tube. Rotating the jewelry breaks newly formed epithelial cells, reopens the wound, worsens inflammation, and increases your risk of hypertrophic scarring and irritation bumps. Modern flat-back posts made from mirror-polished implant metals will not adhere to your skin.
When is it safe to swap starter earrings for hoops or fashion jewelry?
You can swap jewelry once the piercing tract has fully healed: roughly 6 to 8 weeks for standard lobes, and 6 to 12 months for cartilage. Signs of a fully matured piercing include no tenderness, zero crusting, loose jewelry movement without resistance, and no lingering redness. When switching, ensure your new fashion pieces are clean and made from skin-safe, nickel-free materials.
Conclusion and Aesthetic Inspiration
Starting your ear piercing journey is an exciting, creative process. By respecting your ear's anatomy, choosing a professional studio equipped with sterile hollow needles, selecting quality titanium or solid gold posts, and committing to simple saline aftercare, you set yourself up for smooth healing.
Building an intentional, curated ear is a wonderful medium of personal expression, much like exploring regional visual art and curated personal style. Take your time, let each placement heal completely before booking your next appointment, and enjoy the lasting artistry of your personal jewelry collection.